If you’ve been wondering how to make the most of those Google-compatible resources from Teachers Pay Teachers, you’re in the right place. This Google Classroom tutorial breaks down exactly how to assign digital activities to your students – from upload to grading – in a way that actually saves you time. Whether you’re brand new to Google Classroom or just want to streamline your workflow, I’ll walk you through each step so you can get your students working digitally with confidence.
Why Use Google Classroom with TpT Resources?
Here’s something cool: there are over 770,000 Google Apps compatible resources on TpT. You can filter your search results by selecting “Google Apps” under “Resource Types” on the left side of the search results page. That means you have access to an enormous library of ready-to-use digital activities that work seamlessly with Google Classroom.
The real beauty of pairing these two? You’re not spending your evenings at the copy machine, you’re not chasing down lost papers, and you can see exactly who’s completed their work and who needs a nudge – all from one dashboard. Plus, students get instant access to their assignments, and you can provide personalized feedback without drowning in a sea of sticky notes.
What You’ll Need Before Starting
Before we dive into this Google Classroom tutorial, make sure you have:
- A Google Classroom already set up for your class
- Your TpT resource (or any file) uploaded to Google Drive
- About 5 minutes to work through this process the first time
I’m using my Heat Transfer Sort Activity for this Google Classroom tutorial, which includes a Google Slides version that allows students to move pieces around. But honestly, you can use this process with ANY digital file – whether it’s something you created yourself, purchased on TpT, or found elsewhere.
How to Assign a TpT Resource in Google Classroom
Getting Started: Creating Your Assignment
Step 1: Open the Google Classroom class you want to assign work to.
Step 2: Click on Classwork at the top of the page.
Step 3: Click Create, then select Assignment from the dropdown menu.

Setting Up Your Assignment Details
Step 4: Add the details for your assignment. You’ll need to include:
- Title (make it clear and student-friendly)
- Instructions (be specific about what students need to do)
- Points (if you’re grading it)
- Due date
- Topic (optional, but helpful for organization)
To attach your file from Google Drive, click on the Google Drive logo – it’s the second icon that looks like a triangle.

Step 5: Click on My Drive and find the file you want to add to the assignment. Select it, then click Add.

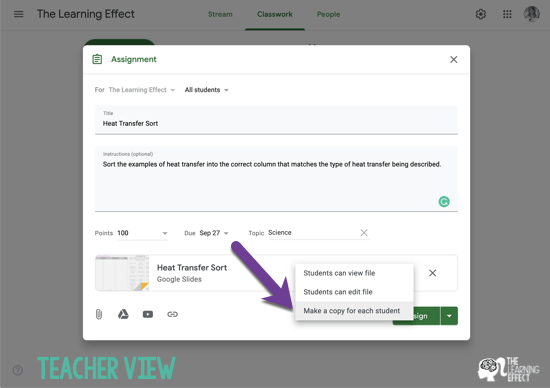
You have three options:
- Make a copy for each student – Use this when each student needs to edit their own version. Google Classroom automatically creates individual copies and renames them with the student’s name and assignment title. Trust me, having those files automatically organized is a game-changer when you’re grading at 9 PM on a Sunday.
- Students can edit file – Choose this for collaborative group projects where multiple students need access to the same document.
- Students can view file – Use this for reference materials, PDFs, or anything students just need to look at without editing.
This is where Google Classroom becomes a huge time-saver. Instead of printing 25 copies or manually sharing files with each student, Google does the heavy lifting for you.
Step 7: Click Assign (or Schedule if you want to set it to post later). Your assignment will now appear in the Classwork feed of your classroom.

The Student Experience
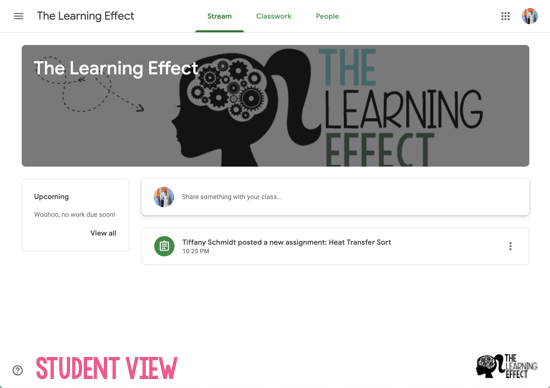
Step 8: When students log into Google Classroom, they’ll see new assignments right on their Stream feed.
Step 9: When a student clicks on the assignment, they can see all the details you added – instructions, due date, points, and the attached file. Notice how the copy created for this student has been automatically renamed with her name and the assignment name.

Step 10: When students open the file, they can begin working on the assignment right away.

Step 11: Once they’ve completed the work, students need to click Turn In to submit it back to you for grading. Make sure your students know this step – their work won’t show up in your grading queue until they officially turn it in.
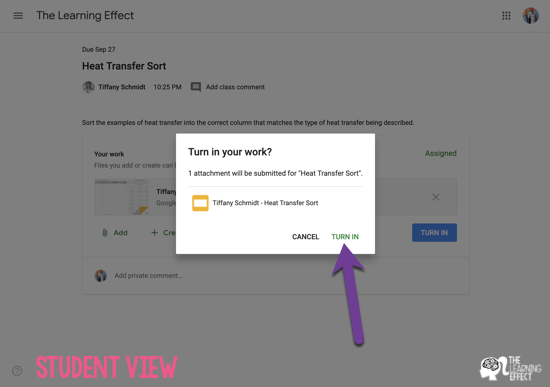
Step 12: Students can see confirmation that their assignment has been turned in. This visual confirmation helps them (and you) keep track of what’s been submitted.

Grading and Returning Work
Step 13: Back in the teacher view, you can see at a glance how many students have turned in their work and how many are still working on it. Click on the assignment to view details.
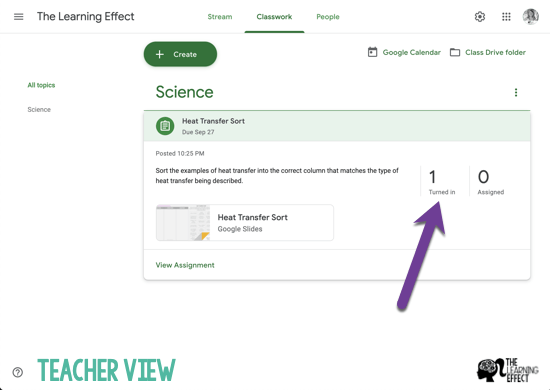
Step 14: Click on Turned In to see who has submitted their work and begin grading.

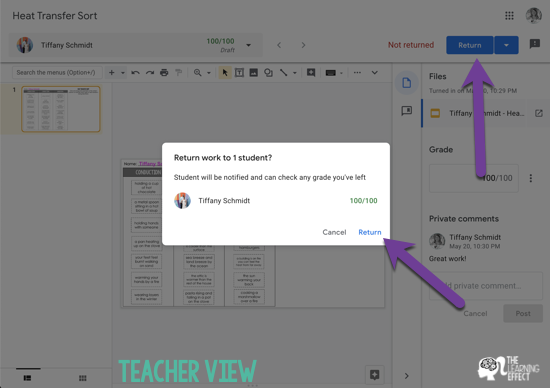
Step 15: In the grading view, you can type in the grade and add personalized comments for students. One of my favorite features is being able to leave specific feedback right here. It takes seconds but makes students feel seen and helps them understand exactly what they did well and where they can improve.

Step 16: Click Return to send the graded assignment back to the student so they can view their grade and your feedback.
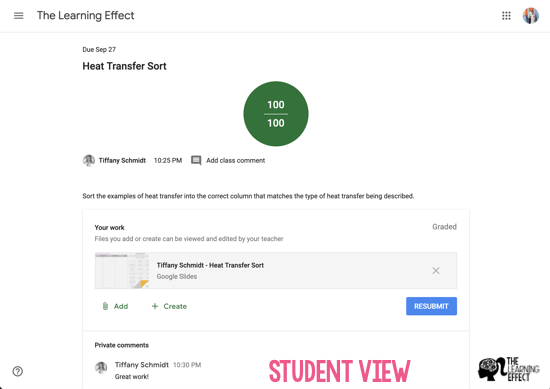
Step 17: Back in the student view, students can see their grade and any comments you left them. If they need to make revisions or redo something, they can do so and resubmit for you to regrade.
Quick Tips for Success
- Start small: Try assigning one digital activity before you go all-in. Get comfortable with the workflow first.
- Teach the process: Walk your students through turning in an assignment at least once. A quick 5-minute demo saves hours of “I thought I turned it in!” conversations later.
- Use the announcement feature: Remind students of upcoming due dates by posting announcements in Google Classroom.
- Check your notifications: Google Classroom can email you when students turn in work, comment on assignments, or need help.
Making Google Classroom Work for You
Once you’ve run through this process a few times, assigning digital work becomes second nature. The beauty of using TpT resources with Google Classroom is that you’re not reinventing the wheel – you’re taking quality materials and delivering them in a way that meets students where they are.
Plus, you’re saving paper, reducing printing time, and creating a digital trail that makes tracking student progress so much easier. When you combine Google Classroom with high-quality resources, you’re setting yourself up for a smoother, more organized school year.
If you’re ready to take your digital assignments to the next level, the Online Kid-Friendly Science Research Guide is perfect for pairing with this Google Classroom tutorial. Inside, you’ll find vetted websites your students can use for research projects – all designed to work seamlessly with the workflow you just learned. Whether they’re researching biomes, constellations, or any other science topic, you’ll have reliable, age-appropriate resources at your fingertips.

Google-Compatible Resources to Try
Looking for more digital resources to use with Google Classroom? Here are some of my favorites from my TpT store:
- Heat Transfer Sort Activity – Perfect for teaching heat transfer concepts with an interactive sorting activity
- Biome Research Google Slides Project and Presentation – A comprehensive research project that pairs beautifully with the research guide mentioned above
- Student Snapshot Poem – A great back-to-school activity to help students share about themselves
I hope this Google Classroom tutorial helped you feel more confident about using digital resources with your students! Remember, the first time through might take a few extra minutes, but once you’ve got the process down, you’ll wonder how you ever taught without it.